Search Plugin configuration
The Zoovu Search Plugin offers several configuration settings to help you customize search behavior, results display, and user interactions.
To activate Zoovu Search and request configuration, please contact your Zoovu representative or send a message to the Customer Success Team.
Step 1: Set up pass-ons, filters, and sorting
Before setting up the search plugin, start by configuring the data required for the search UI: pass-ons, filters, and sorting.
Pass-ons
Pass-ons define the attributes needed for search results to display correctly. These attributes can be:
- Displayed directly (e.g. price, product name).
- Used as helpers (e.g. hiding "Add to cart" if stock = 0).
There are two types of pass-ons:
- Pass On - attributes to be included in search result and relation response
- Pass On Suggestion - attributes to be included in autocomplete response
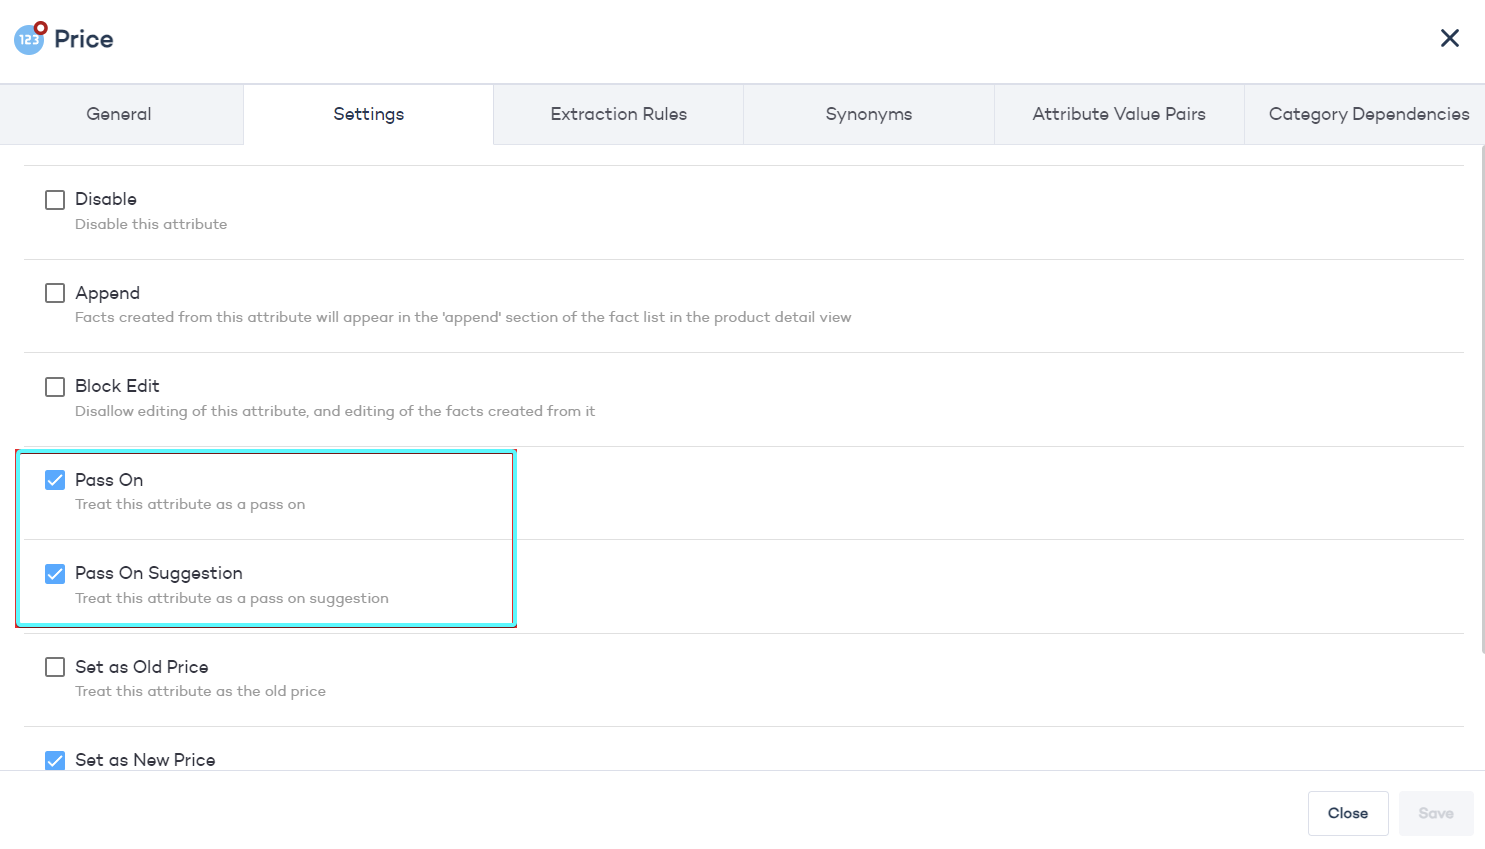
To configure pass-ons:
- Go to Data Platform > Ontology.
- Edit an attribute, e.g.
price. - In settings, tick the box next to "Pass On" and/or "Pass On Suggestion".
Only configure the pass-ons that are truly needed. Adding too many attributes can slow down search response times.
Filters and sorting
Filters and sorting allow users to refine and organize search results.
To configure:
- Go to Search Studio > Filters and Sorting.
- Define the filters that users can apply.
- Set up the sorting options.
Step 2: Create and preview the search plugin configuration
Once pass-ons, filters, and sorting are set up, go to Search Studio > Design & Publish to configure the search plugin. Learn more.
Initial setup:
- Primary color – Match your branding (used for buttons and UI elements).
- Search box and button selectors – CSS selectors pointing to the search box and button on your site.
- How to show results – Embed search results on your search results page.
- Enable filters.
- Configure the search result layout for desktop and mobile.
Important: If search results share the same URL as the native search, use a different query parameter. This prevents the search logic from slowing down the page.
Preview options
You can preview the search UI using:
- Built-in preview (recommended).
- Chrome extension (Tampermonkey) – Injects the plugin on the live site.
- Your dev/staging site – Requires adding a search code snippet.
Built-in preview
Preview your configuration instantly using an empty template page or by entering your domain.
Advantages:
- Works instantly, no need to publish.
- Can be opened in a new tab for full-screen preview.
- Prevents conflicts if search is already live on your site.
Disadvantages:
- Redirects may not work as expected.
- Stylesheets/assets may not load correctly.
- Small preview if not used in full-screen mode.
Using an empty template page may cause display differences, especially if your CSS is not loaded.
Tampermonkey extension
Use the Tampermonkey Chrome Extension to inject the search script directly into your site.
Use the script below (replace shop.co.uk with your domain and add the plugin configuration ID from the publish step):
// ==UserScript==
// @name         Direct Search
// @namespace    http://tampermonkey.net/
// @version      2024-11-14
// @description  Injects the Zoovu search plugin
// @match        https://www.shop.co.uk/*
// @icon         https://www.google.com/s2/favicons?sz=64&domain=shop.co.uk
// @grant        none
// ==/UserScript==
(function() {
    const s = document.createElement('script');
    s.setAttribute('defer', 'defer');
    s.src = 'https://js.search.zoovu.com/plugin/bundle/52253.js';
    document.body.appendChild(s);
})();
Advantages:
- Closest to real results on the live site.
- Allows full-screen preview. Disadvantages:
- Requires publishing after every change.
- May conflict with an existing search plugin on your site.
Step 3: Customize search result cards
You can modify search result cards in two ways:
- Override the result renderer – Customize specific elements while keeping existing features.
- Use templating – Define a completely new layout using HTML and placeholders.
Option 1: Override the result renderer
To tweak the SKU display, CTA button, and price styling, go to Design & Publish > Advanced > Additional CSS and add:
.z-search-suggests__content {
    display: grid;
    gap: 0.5rem 1rem;
    grid-template-columns: 2fr 1fr;
}
.z-search-suggests__price {
    color: #c5000c;
    font-family: 'gibson_semibold';
    font-size: 27px;
    line-height: 1.4;
}
To modify search results behavior, define a custom Product Result Renderer:
class CustomProductResultRenderer extends ProductResultRenderer {
    renderDataPoints(wrapper, product) {
        const dataPoints = this.getDataPoints(product);
        const ul = document.createElement('ul');
        ul.className = 'z-data-points';
        dataPoints.forEach((dp) => {
            const li = document.createElement('li');
            li.innerText = `${dp.key}: ${dp.value}`;
            li.className = 'z-data-points__entry';
            ul.appendChild(li);
        });
        wrapper.appendChild(ul);
        return ul;
    }
renderHeader(wrapper, product) {
        const header = super.renderHeader(wrapper, product);
        if (product.getIdentifier() !== undefined) {
            const skuNode = document.createElement('p');
            skuNode.className = 'z-sku';
            skuNode.innerText = `SKU: ${product.getIdentifier()}`;
            header.appendChild(skuNode);
        }
        return header;
    }
getCtas(product, _resultGroup) {
        return [{
            text: 'View product',
            link: this.getLink(product),
            primary: true,
            icon: 'none'
        }];
    }
}
Advantages:
- Supports comparison, chat, and recommendations.
- Uses existing functionality without needing a full redesign. Disadvantages:
- Requires advanced CSS and JavaScript knowledge.
- May take longer to match customer’s exact design.
Option 2: Using templates for custom result cards
If the default card structure does not meet your needs, you can fully customize the search result card layout using templates.
How templating works:
- Choose the most complex product card from your site as a reference.
- Format the HTML and replace specific data (e.g., product title, price) with placeholders.
- Use template variables to dynamically insert data.
Example: Basic result card template
<div class="OfferBox">
   <div class="sr_image">
      <a href="##LINK##" title="##NAME##">
         <img src="##IMAGE##" alt="##NAME##">
      </a>
   </div>
   <div class="OfferBoxProdInfo">
      <h3><a href="##LINK##">##NAME##</a></h3>
      <p>SKU: ##IDENTIFIER##</p>
      <div>##DATA_POINTS##</div>
   </div>
   <div class="OfferBoxPrice">
      <span class="offerprice">##PRICE##</span>
      <a class="button" href="##LINK##">View product</a>
   </div>
</div>
Replacing placeholders with template variables
Modify the template by replacing placeholders with Zoovu’s template variables:
| Placeholder | Replace with |
|---|---|
##LINK## | {{link}} |
##IDENTIFIER## | {{identifier}} |
##NAME## | {{name}} |
##IMAGE## | {{image}} |
##DATA_POINTS## | see below |
For data points, use a loop:
<ul>
    {{#dataPoints}}
        <li><span>{{key}}:</span> <span>{{value}}</span></li>
    {{/dataPoints}}
</ul>
Formatting price dynamically
Use the Result Template Built Callback to ensure proper currency formatting:
function(resultTemplate, result) {
    const price = result.dataPointHash.price[0];
    if (price !== undefined) {
        const priceFormatter = new Intl.NumberFormat('en-GB', {
            style: 'currency',
            currency: 'GBP',
        });
        const priceFormatted = priceFormatter.format(parseFloat(price.replace('£', '')));
        resultTemplate = resultTemplate.replace(/##PRICE##/g, priceFormatted);
    } else {
        resultTemplate = resultTemplate.replace(/##PRICE##/g, '');
    }
    return resultTemplate;
}
Styling the result card
Once the template is set up, refine its appearance using CSS.
.OfferBox {
    border: 1px solid #ccc;
    padding: 10px;
    display: flex;
    gap: 10px;
}
.offerprice {
    font-size: 1.2rem;
    color: red;
}
Step 4: Customizing filters and autocomplete
Styling filters
To match the filter styling to your UI, add custom CSS:
.z-search-filter {
    border-radius: 10px;
    background-color: #f1f1f1;
    padding: 10px;
}
.z-search-slider__submit {
    background-color: #04865c;
    border-color: #04865c;
    color: white;
}
Adjusting autocomplete
Modify the autocomplete layout and styling to align with your search suggestions.
.unibox {
    border-radius: 0;
    color: #000;
    font-size: 14px;
}
.unibox__suggest-heading {
    font-weight: bold;
    border-bottom: 1px dotted silver;
}
Step 5: Publishing the search configuration
Once everything is tested and ready:
- Click Publish in Search Studio > Design & Publish.
- Embed the generated code snippet in your website.
Any changes made after publishing remain in draft mode until published again.
Callbacks
Callbacks allow you to modify the search behavior dynamically.
| Callback | Purpose |
|---|---|
Postsearch | Modify search results after they load. |
Presearch | Validate and modify search before execution. |
Filter Rendered | Adjust filter behavior. |
Add to cart | Handle product addition to cart. |
PreInit and Init | Can be used to perform dynamic modifications on the search configuration and to define global variables that can be reused in other callbacks. |
Example: Using Postsearch callback
function(data) {
    if (data.interpretedQuery.original.toLowerCase().includes('laptop')) {
        window.ZOOVU_SEARCH.openTab('Electronics');
    }
}
Dynamically changing settings
Modify search settings on the fly using the PreInit callback:
function(config) {
    config.userGroup = window.isLoggedIn() ? 1 : 2;
}
Controlling the search plugin
The Zoovu Search Plugin API allows programmatic control.
Example:
window.ZOOVU_SEARCH.changeConfig('results.embedConfig.contentBlock', '#main');