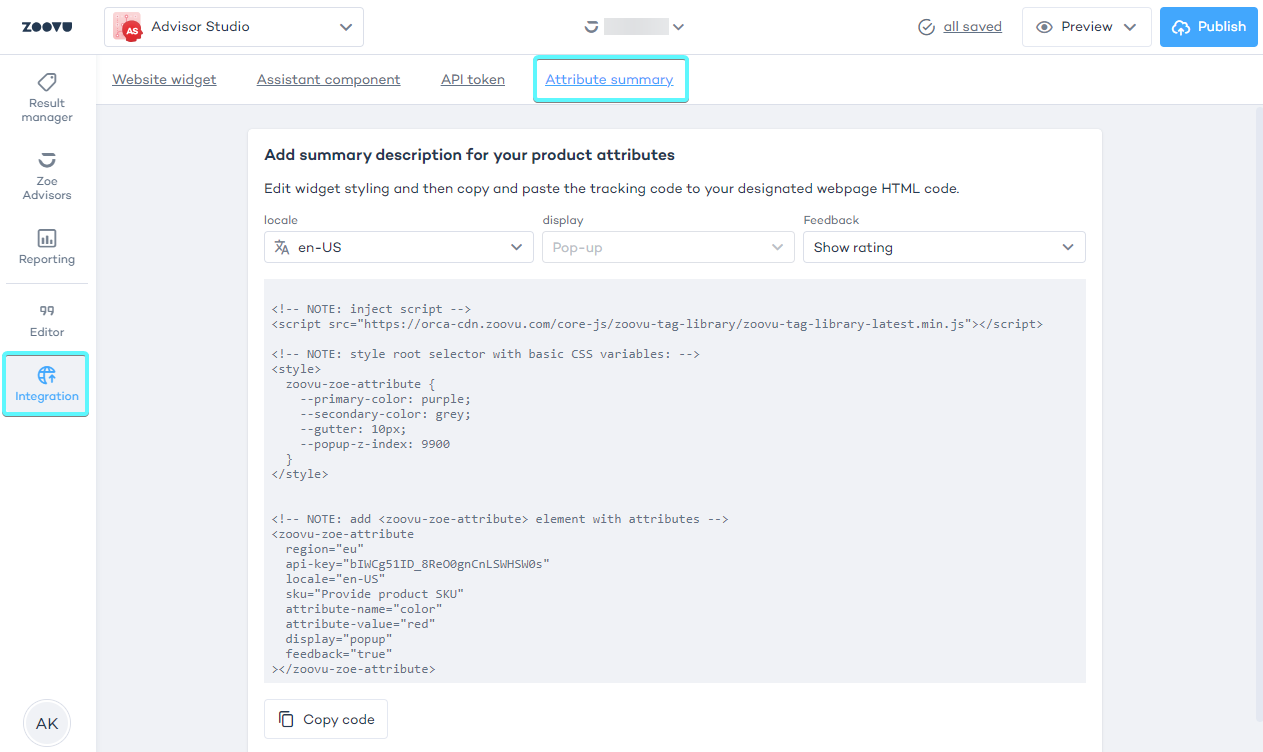
Attribute summary: integration and styling
The attribute summary in Zoe helps users understand product details. For example, if a product has 16GB of RAM, Zoe can explain what that means and how it can be useful.
This guide explains how to set up, configure, and style the <zoovu-zoe-attribute> element in your website to enable attribute summaries.
You can find the integration code by navigating to Advisor Studio > Integration > Attribute summary.
Step 1: Include the Zoovu Tag Library
To enable Zoe's functionality, you need to include the Zoovu Tag Library in the <head> section of your webpage:
<script src="https://orca-cdn.zoovu.com/core-js/zoovu-tag-library/zoovu-tag-library-latest.min.js"></script>
Step 2: Configure the attribute summary element
There are two ways to configure the attribute summary element:
- Option 1: Use a configuration script (best for managing multiple attributes or reusing configurations across multiple pages).
- Option 2: Configure in HTML (best for smaller setups or individual attributes). Choose the approach that works best for your setup. If you’re unsure, start with Option 1.
Any changes to zoovu-zoe-attribute-config require connecting zoovu-zoe-attribute elements to the DOM again.
Option 1: Use a configuration script
Add the following script to your HTML to define key details such as the region, API key, locale, and SKU:
<script id="zoovu-zoe-attribute-config" type="application/json">
{
    "region": "eu",
    "apiKey": "your-zoe-api-key",
    "locale": "en-IE",
    "sku": "your-product-sku"
}
</script>
Next, add Zoe attributes to your page:
<zoovu-zoe-attribute attribute-name="size" attribute-value="large"></zoovu-zoe-attribute>
<zoovu-zoe-attribute attribute-name="color" attribute-value="red"></zoovu-zoe-attribute>
Option 2: Configure Zoe in HTML
If you prefer, you can define all settings in each <zoovu-zoe-attribute> element:
<zoovu-zoe-attribute
    region="eu"
    api-key="your-zoe-api-key"
    locale="en-IE"
    sku="your-product-sku"
    attribute-name="size"
    attribute-value="large">
</zoovu-zoe-attribute>
Step 3: Connect Zoe elements to the DOM
Whenever you make changes to the <script id="zoovu-zoe-attribute-config"> configuration, make sure to reconnect the <zoovu-zoe-attribute> elements to the DOM. Simply reload the page or use JavaScript to reconnect the elements dynamically.
Advanced setup with JavaScript API (optional)
For dynamically loaded content, use JavaScript API. This method allows you to add or update Zoe attributes without reloading the page.
This method is ideal if:
- You want to dynamically create attribute elements.
- You need full control over when and how the elements are added to the page.
- Your page dynamically updates content based on user actions.
Example: Create and add a Zoe attribute element
const script = document.createElement("script");

script.setAttribute('src',"https://orca-cdn.zoovu.com/core-js/zoovu-tag-library/zoovu-tag-library-latest.min.js");

document.head.appendChild(script);

const element = document.createElement('zoovu-zoe-attribute');

element.setAttribute('region', "eu");
element.setAttribute('api-key', "zoe-api-key");
element.setAttribute('locale', "en-IE");
element.setAttribute('sku', "sku");
element.setAttribute('attribute-name', "name");
element.setAttribute('attribute-value', "value");

document.body.appendChild(element);
Troubleshooting tips
- Make sure the Zoovu Tag Library script is fully loaded before configuring attributes.
- Double-check your API key, region, locale, and SKU values for accuracy.
- Refresh the DOM connections after modifying configuration scripts.
Customize attribute summaries
Zoe can be styled by the global CSS with some basic css variables or specific parts using shadow parts.
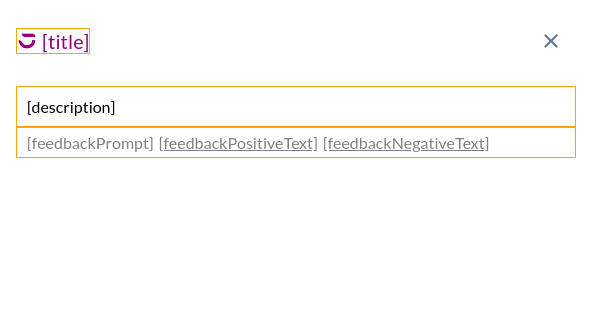
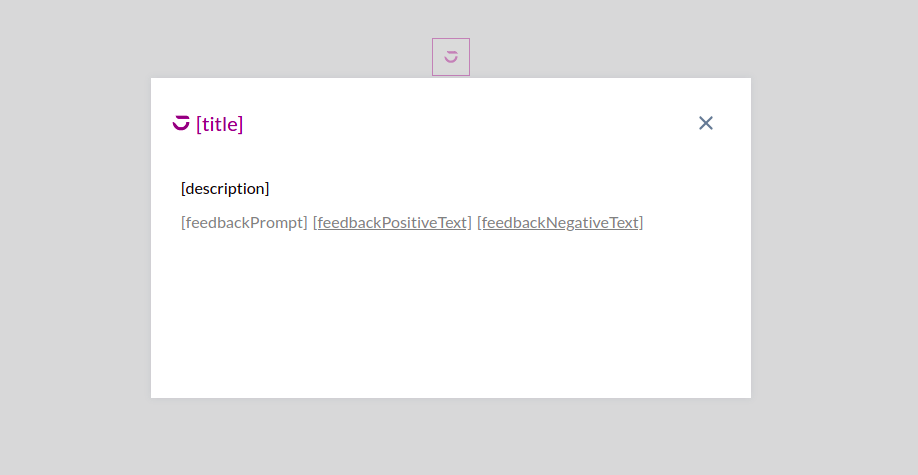
Standard texts
You can customize the standard text displayed by Zoe, such as titles or error messages. Override these in your configuration script or directly in the <zoovu-zoe-attribute> element.
 {
    "title": "Perfect for you",
    "generalError": "We're experiencing a glitch. Please retry later.",
    "chatGeneralError": "We're experiencing a glitch. Please retry later.",
    "chatLimitError": "You reached your limit. Please restart to test again",
    "chatUserMessageLimitError": "Question exceeds character limit",
    "chatInputPlaceholder": "Ask your question here...",
    "feedbackPrompt": "Was this helpful?",
    "feedbackPositiveText": "Yes",
    "feedbackNegativeText": "No",
    "popupButton": "Ask about this product",
    "feedbackAcknowledgement": "",
    "disclaimer": "",
    "termsConditions": "",
    "a11y": {
        "generalLabel": "Zoe - generative AI shopping assistant",
        "chatMessageLabel": "Zoe says",
        "chatUserMessageLabel": "I say",
        "submitLabel": "Send",
        "suggestedQuestionsLabel": "Suggested questions to Zoe",
        "popupCloseButtonLabel": "Close Zoe",
    },
  }
Example: Changing the title
<!-- via configuration script -->
<script id="zoovu-zoe-attribute-config" type="application/json">
{
    "standardTexts": { title: "How can I help?" }
}
</script>

<!-- or via attribute -->
<zoovu-zoe-attribute standard-texts='{"title":"How can I help?"}'></zoovu-zoe-attribute>
Example: Styling the title part's background
 zoovu-zoe-attribute::part(title) {
    background: yellow;
    color: red;
 }

**Example: Styling the main part**

```css
zoovu-zoe-attribute {
    --primary-color: orange;
    --secondary-color: grey;
    --gutter: 20px;

    font-size: 16px;
}
Popup
By default, Zoe displays a button (without text) that triggers a centered dialog with a backdrop. You can style the popup and its elements using CSS or replace the default button with your own.
Additional CSS variables:
zoovu-zoe-attribute {
    --popup-z-index: 9900;
}
Additional elements you can style:
zoovu-zoe-attribute::part(popup) {}
zoovu-zoe-attribute::part(popup-backdrop) {}
zoovu-zoe-attribute::part(popup-button) {}
For inspiration check variants for Zoe popup
Example: Toggle dialog by event
You can hide the default button using CSS, and toggle the dialog using events:
<style>
    zoovu-zoe-attribute::part(popup-button) {
        display: none;
    }
</style>

<script>
    function showZoe() {
        document
            .querySelector('zoovu-zoe-attribute[attribute-name="name"]')
            .dispatchEvent(new Event('show-zoovu-zoe-attribute-name'));
    }
</script>

<button onclick="showZoe()">Show zoe attribute</button>
Templates
Feedback acknowledgement
Add feedback options like thumbs-up or thumbs-down for users to rate Zoe's explanations. Use the HTML template:
<template id="zoe-attribute-feedback-acknowledgement">Feedback acknowledgement</template>
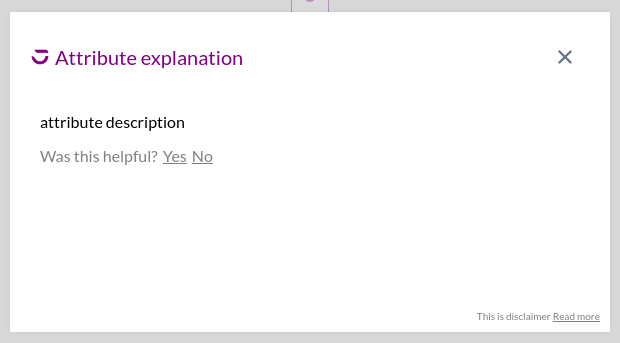
Disclaimer
The disclaimer (information about Zoe's limitations) is placed at the bottom of the component when zoovu-zoe-attribute-disclaimer template is not empty. The template needs to be placed before the Zoe element.
Example: disclaimer
<template id="zoovu-zoe-attribute-disclaimer">
    This is disclaimer <a href="#link">Read more</a>
</template>
Parts:
zoovu-zoe::part(disclaimer) {}