Enable sorting by price
This guide will show you how to set up a price data point using XPath or CSS selectors. Once you’ve configured it, prices will appear in search results, and customers will be able to filter and sort products by price:

Step 1: Extract the XPath for price
To start, point the crawler to the price element on your product pages. This is done using XPath or CSS selectors.
- Install the Google Chrome extension called "XPath Helper."
- Activate the extension, hold the Shift key, and hover over the price element on your page.
- Simplify the XPath to make it applicable across all similar pages, not just the one you’re currently viewing.
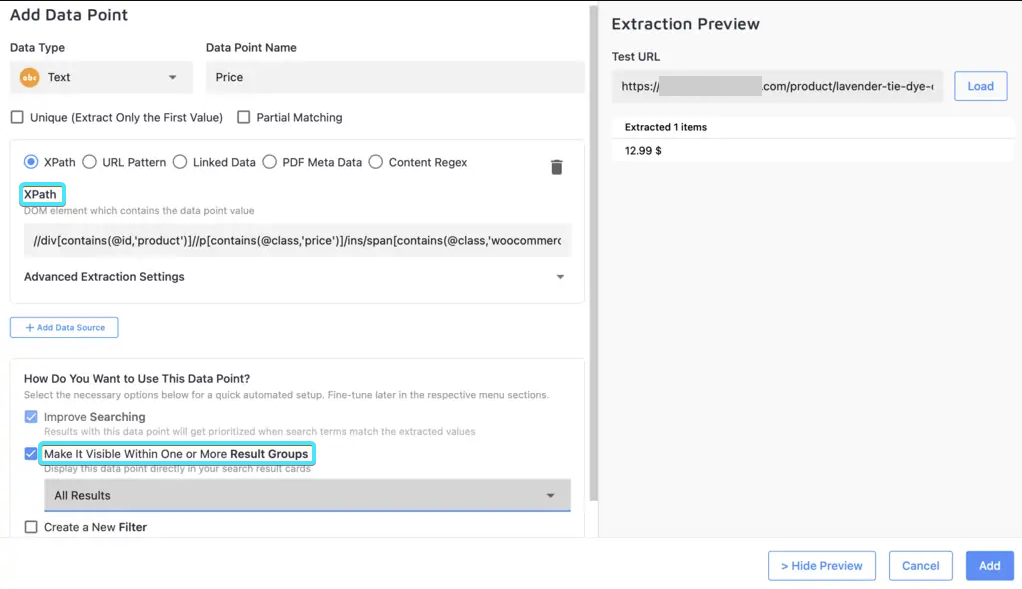
Step 2: Set up data points
Now that you have your XPath, you can set up the data points in Zoovu Search.
Adding a text data point for price
- Go to Data Structuring > Data Points in the control panel.
- Click "Add New Data Point" and enter the following:
- Data Point Name: e.g., "Price"
- XPath: Paste the XPath you extracted.
- Data Type: Select “Text” if you want to display the price as a snippet in search results.
- Make It Visible: Ensure the data point is visible in the search results by selecting the appropriate option.
Adding a numeric data point for price filters
- Data Type: Choose “Number” to create a filter, like a price range slider.
- Add a filter: Selecting “Create New Filter” will automatically set up a price filter for this data point.
- Sorting option: You can also create a sorting option to allow customers to sort by price.
Step 3: Add price to search snippets
To display the price in search snippets:
- Go to Data Structuring > Result Grouping.
- Select the Group: Choose the result group where you want the price to appear (e.g., in the “Products” group).
- Edit and Add the Data Point: Use the “Edit” icon to add the price data point to the snippet.
Step 4: Configure your price filter
Once your price data point is set up:
- Check Filters and Sorting > Filters: Make sure your price filter is correctly created and visible.
- Customize the Filter: You can rename and adjust the filter’s data type as needed.
- Choose Filter Type: Use a range filter for dynamic price selection.
- Select Groups: Decide whether the filter should be available across all result groups or only specific ones.
Step 5: Test your setup
After setting up everything:
- Re-index your project: Go to the Index section and re-index to apply the changes.
- Preview your results: Head to Search Preview, enter a query, and see how your filters and snippets appear.